Picture an impeccably detailed car, glimmering under the soft, dappled sunlight as it curves down a coastal highway. It’s a sight to behold, isn't it? But what if you could make that image last longer? What if you could shield your vehicle from the harsh realities of weather, road debris, and regular wear and tear? In this guide, we'll reveal the secret to keeping your car looking showroom new for years on end: Paint Protection Film. We’ll show you how this high-tech vehicle armor can actually self-heal and offer valuable resistance against scratches and chips. Ready for a deep dive into maintaining car aesthetics? Keep reading.
Preparing Your Car for PPF Installation
Getting ready to install paint protection film (PPF) on your car requires a few crucial steps. Unlike other types of detailing, PPF installation is time-consuming and can be costly if not done correctly. Therefore, skipping preparation and hurrying through the process is not the right approach.
Before installing the PPF, there are several things you need to do to ensure that your vehicle's surface is clean, smooth, and free from imperfections. These steps will guarantee optimal adhesion of the film and ultimate longevity of both film and paint.
First, you'll want to ensure that your car has had a thorough wash with soap that does not contain any wax or sealant materials; these materials can interfere with the effectiveness of the adhesive. You'll also want to avoid rinsing your car with hard water; this contains minerals that evaporate when dry and could leave marks on your vehicle's surface.
Once your car is washed, you should physically inspect every inch of its surface for loose paint, scuffs, scratches, chips, rust spots, and dings. Any part that is somehow bumpy or not perfectly smooth will cause air pockets between the PPF and your vehicle's metal surface. Ultimately, those air pockets create an uneven bond, which can lead to trapped moisture causing bubbles or peeling over time.
Some people skip preparation entirely or think they can just sand off debris from their vehicles' surfaces before installing the PPF. This technique is not good because it can roughen up the paintwork's clear coat finish beneath the PPF in some cases, leading to excessive scratches or even further harm than what was on the car before.
- According to a report by TechSci Research, the global paint protection film market is projected to grow at a CAGR of over 5% during 2022–2026.
- An industry survey shows that nearly two-thirds of new car buyers consider adding protective elements such as PPF to their vehicles.
- A study conducted in 2019 found that, among vehicle owners who installed PPF, almost 80% reported improved vehicle aesthetics and longer-lasting paintwork.
Cleaning and Inspecting the Car Surface
After washing, claying, and repairing bumpy spots on your car's surface, comes the final yet crucial polishing step to remove any minor scratches, if there are any. To do this properly, use a medium-cut polish to remove light scratches and swirl marks. After applying, be sure to rinse thoroughly.
A clean car surface means it's free of contaminants such as tree sap, bug residue, grease stains, and other elements that have bonded to the paint. If you miss cleaning these areas, then they will still hinder proper adhesion between the PPF and painting service, leading to bubbles or even peeling.
Imagine painting over dirt on a wall; this is equivalent to installing PPF on an unclean surface. Besides being unsightly, you'll have flawed results. In other words, no matter how small the debris might seem, avoid skipping cleaning because it can affect the adhesive properties of PPF film.
Lastly, and perhaps most importantly, cleaning your car's surface before PPF installation has everything to do with time management. Taking time to detail your vehicle will pay off in longevity and protection from paint features when using PPF products. Consider this for a moment; when driving around in public spaces prone to rocks and environmental hazards that can damage your car's paintwork, not having adequate protection in place could end up saving you thousands of dollars later.
Using Detailing Clay for Preparation
Before applying the paint protection film (PPF), it is crucial to ensure that the surface of the car is clean and contaminant-free. Even small bits of dirt or debris can create unsightly blemishes on your PPF, reducing its effectiveness in protecting your vehicle's paint job.
One of the best methods for deeply cleaning your car's surface is to use detailing clay. Detailing clay is specially formulated to remove embedded contaminants from the clear coat of a car, leaving behind a perfectly smooth surface that's ready for PPF installation.
To use detailing clay, start by washing the car with soap and water, making sure to scrub any particularly dirty areas. Once you've rinsed off all the soap suds, dry the car completely with a chamois or microfiber towel.
Next, spray a clay lubricant onto a small section of the vehicle. Be sure to only work on one panel at a time so that the lubricant doesn't dry before you have a chance to clay it.
Take a piece of clay and flatten it out in your palm. You want it to be about 2–3 inches in diameter and big enough to glide easily over the surface of your car.
Using moderate pressure, rub the clay back and forth across each panel of the car in straight lines until you've covered its entire surface. You should feel some resistance as you work the clay over stubborn contaminants like tar or sap.
Finally, wipe away any remaining clay residue and lubricant with a clean microfiber towel and move on to the next panel.
One advantage of using detailing clay for PPF preparation is that it eliminates any small particulates that might 'grab' onto PPF, which could leave dents when removed. These particulates include pollutants like gravel, brake dust, or industrial fallout. They can get lodged in the porous materials of your clear coat, which can lead to scratches.
Detailing clay can be a bit confusing for newcomers, and there are many different types of clay lubricants and clays themselves. For example, some detailers believe that the color of the detailing clay matters. As gray, red, or blue clay is stiffer and more substantial, it can be more aggressive on your vehicle's surface but sometimes leave marks.
On the other hand, softer clay is easier to work with but may not remove very tough contaminants.
Steps for Applying PPF
Applying PPF can be a bit daunting because you want to make sure you get it right the first time. Here are the basic steps you'll need to follow to apply PPF properly:
1. Cut the Film: First, measure how much of the film you will need for each panel and cut it accordingly. Make sure to give extra coverage, which you can cut later in place.
2. Prepare the Car Surface: Next, remove any dust or lint from the inside face of the film with a clean microfiber towel. Then clean off any remaining residue from any adhesive backing as well as prepare each panel by spraying them with soapy water or a dedicated blending solution (like Rapid Tac), which contains alcohol to quicken evaporation.
3. Apply Film:
Position each piece of cut-to-size film onto the corresponding panel of your vehicle slowly because once it sticks on, there is no undoing it! Take care not to apply too much pressure until you're sure they're in their correct position.
4. Squeegee Out Bubbles: With the help of squeegees, push out excess water and bubbles from beneath the PPF. You could start with a hard squeegee first, but make sure you use a soft one or felt block for the final touch.
5. Trim Excess Film: Finally, trim the edges of the film using either a scalpel or a pair of scissors. Do this step slowly and carefully to avoid cutting off areas of your freshly installed PPF.
Once you've completed all of these steps, your vehicle will be adequately protected from most contaminants that would otherwise harm its paint job. It's important to remember that proper application and maintenance are essential to keeping your PPF effective over time.
Applying paint protection film can be difficult to get right at first, but taking your time during the process is key to enjoying years of protection for your car. However, self-installation does come with some risks, like leaving bubbles underneath the film that need repositioning or having misaligned edges.
It is not always straightforward to line things up precisely; you might also realize halfway through the installation that you've run out of material in the middle of an area. That is why professional PPF installers exist!
There are various types of PPF on offer by different suppliers, mostly with unique characteristics that set them apart from their competitors. In general, they all have self-healing abilities and ultra-high clarity features, which provide clear visibility as opposed to traditional vinyl wraps.
Now that we've explored how detailing clay helps prepare our car surface adequately before PPF installation, let's move on to what occurs after the installation: post-installation care tips
Applying and Adjusting the Film
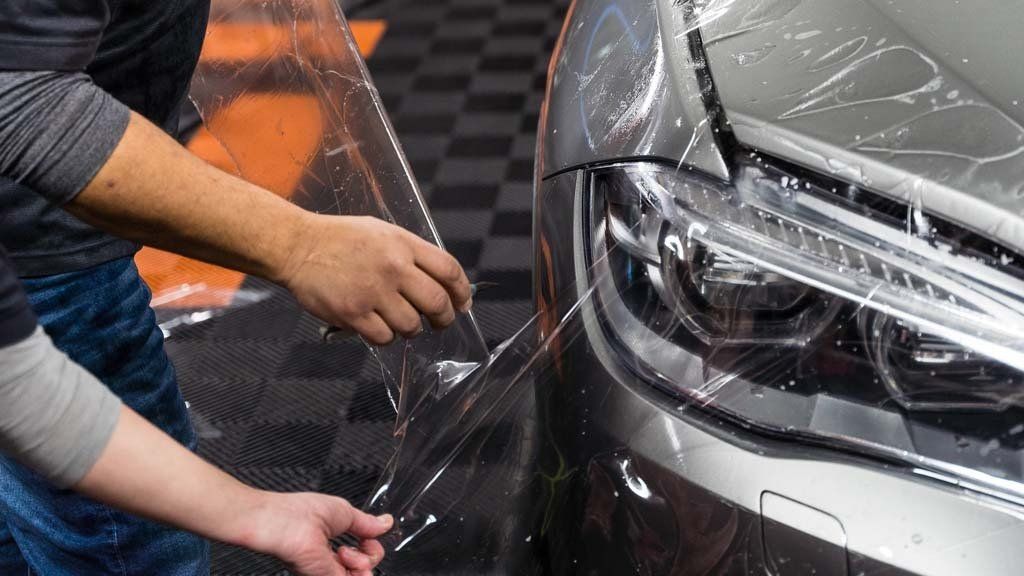
Applying paint protection film (PPF) is a delicate process that requires skill, attention to detail, and experience. The first step in applying PPF is to measure and cut the film according to the size of the car's surface. Cutting the film with precision will ensure that it fits perfectly, preventing any lifting or peeling in the future.
Once you have your PPF cut out, it's time to start applying it. Begin by peeling back a small section of the protective adhesive and spraying it with a slip solution. This solution helps slide the film around for accurate placement before you squeegee it into place.
It's highly recommended that you find an assistant to help you when installing PPF. This is especially important when working with large sections of film. Your assistant should hold up the film while you make adjustments to ensure correct alignment and an even application.
When applying PPF, avoid stretching or forcing the film into place, as this can cause bubbles, creases, or lifting later on. Gently tap and stretch to allow airflow beneath, which will then give the squeegee a chance to push out any bubbles that may form without damaging the paint surface below.
There are different ways of applying PPF; some people prefer wet applications where slip solutions are used during installation, while others choose dry applications where heat guns are used instead of solutions. Dry application methods require skills since they don't use liquids as a buffer between your car's paintwork and PPF, which increases the risk of poor placement techniques such as wrinkles or non-aligned patterns.
While both methods can be effective, the wet application is highly recommended. Wet installations provide more limited room for errors while allowing plenty of time to adjust the film and maintain its correct position.
Regardless of which method you choose, once the PPF is correctly positioned, it's time to start squeegeeing it into place.
Squeegee Techniques for Smooth Application
Squeegeeing is a crucial part of PPF installation, and getting it right will determine the longevity of your PPF on your car. A well-squeeged application will prevent air bubbles from forming and make sure that the alignment is accurate.
To achieve success in squeegeeing your film into place, use a high-quality squeegee that's made specifically for PPF installation. Don't use any old squeegee; it won't be as effective!
A good quality squeegee will help to smooth out the film over curves and edges without damaging or stretching it. Always remember to apply gentle pressure when squeegeeing. Be careful not to apply too much pressure, which can result in damage to any curves or aggressive angles in the car's surface. Overstretching can compromise the integrity of your paint protection film as well.
Once you have squeegeed every inch of PPF into place, ensure complete adhesion has occurred around all edges. This is important since any small gaps will allow air to seep underneath the film, eventually leading to unwanted lift or peeling. Take extra care in these areas while making sure you seal the PPF carefully around masked off areas such as door jams and rubber seals.
Now that you have gotten through applying and squeegeeing your PPF into place, there are still further steps recommended for post-installation care to ensure your new paint protection lasts a long time.
Post Installation Care Tips
After the installation of paint protection film (PPF), it is essential to follow proper care guidelines to maintain its effectiveness and longevity. Here are some tips to ensure your PPF stays in top condition:
Avoid Washing Your Car for at Least 48 Hours
PPF requires time to adhere correctly, and washing your car too soon after installation can damage the film. Instead, wait at least 48 hours before washing your vehicle.
Avoid Harsh Chemicals
Harsh chemicals, including acidic solutions and abrasive cleaners, can damage the PPF. Use mild car soaps and avoid using any cleaner that contains vinegar or alcohol.
Regularly Clean the Film
Dirt, road grime, and environmental elements can accumulate on the PPF over time, leading to a cloudy appearance. Clean the film regularly with a microfiber towel and mild soap to keep it clear.
Do Not Wax or Polish the Film
Waxing or polishing the film can cause buildup that attracts dirt and grime, ultimately reducing its effectiveness. Instead, use a detail spray designed for PPF to help protect it.
Treat It Like Your Skin
Just like you take care of your skin by avoiding harsh chemicals and cleaning it regularly, you need to treat your PPF in a similar manner. By doing so, you will extend its life and keep it looking great.
Regular Maintenance for PPF Longevity
In addition to proper post-installation care tips, regular maintenance is necessary for PPF longevity. Here are some tips on keeping your PPF in top shape:
Rinse Off Any Debris Daily
Rinse your vehicle with water daily to remove any debris, such as bugs or bird droppings, that may have landed on the PPF. Doing so can prevent these substances from damaging the film.
Be Careful When Using Automatic Car Washes
Automated car washes may have brushes or other abrasive elements that can damage the PPF. Try to use touchless car washes or hand washing methods instead.
Inspect the Film Regularly
Inspect your PPF regularly for any potential damage or signs of lifting. If you notice anything, take it back to a professional detailing shop immediately to have it repaired before it gets worse.
Avoid Parking Under Trees
While parking under trees may offer shade and protection from environmental elements, it also increases the chances of bird droppings and sap getting onto the PPF, which can be difficult to remove.
Consider It an Investment
Think of your PPF as an investment in your vehicle's long-term appearance and resale value. By maintaining it properly, you will get more out of your investment and protect your car's exterior for years to come.
Final Words
Don't compromise on the quality of your car's protection. Trust the experts at Maryland Auto Spa to handle your PPF installation with precision and care. Our team of professionals will ensure a flawless application, leaving your car with a smooth and seamless finish.
Ready to protect your car's paint job and keep it looking showroom new for years to come? Choose Maryland Auto Spa, your trusted partner in maintaining car aesthetics. Our experts specialize in installing high-quality Paint Protection Film (PPF) that offers valuable resistance against scratches, chips, and the harsh realities of weather and road debris.
Don't wait until it's too late. Visit our website or contact us today to schedule your PPF installation and give your car the ultimate armor it deserves. Invest in your vehicle's long-term appearance with Maryland Auto Spa.
Protect your investment with Maryland Auto Spa and enjoy a showroom new look for years to come.
Contact us today!
Blog